|
|
|

Building the Big Jungle Gym Ceiling
The ceiling isn't so tough to make - and it looks very professional!
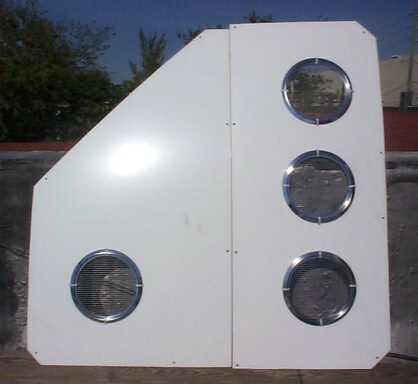
I produce the ceiling
in two panels, but only because I have to ship them out.
You don't need to cut your ceiling in half.

At Home Depot, in the
paneling department, are sheets
of melamine about 1/8" thick.
If you went shopping with
the Material List, you already have
several of these 4 x 8 foot sheets, all cut up into the sizes you need.
Having Home Depot make the
cuts for you is a huge advantage!
For the ceiling, it's fairly simple to make:
Place the 4x4 sheet on top of the cage and mark along the front door edge.
The measurements are generally
23 1/2" in from the front-most corner.
Cut the front corner off, leaving you with your ceiling shape.
Tip: cut from the shiny side and then sand the edge smooth.
While you're at it, cut
off the three other corners, too.
Just measure 2 1/2" in from each corner,
draw a line and cut off the tiny piece.
Now it's time to lay out the chrome trim rings...
You can use any layout
you like. I like about 5 1/2" in from the edges.
Just make sure that you leave room for a UVb light fixture.
Take the four trim rings
and lay them out on the shiny side.
Use a marker to trace the inside circle of each trim ring.
Drill a starter hole just outside the circle trace and use a saber saw to cut a circle 1/2" outside of the traced circle.
Use a drill bit that is
just slightly larger than your cable-ties to drill four holes.
Position the holes just outside of the edge of the trim ring. Mark them if you
need to.
It doesn't have to be perfect, just aim for North South East & West.
Okay, now flip the ceiling
over and cut a strip of uncoated wire cloth a little oversized.
(That's Tom, by the way. He helped me build a few cages over the Summer.)
Now for the tricky part:
slide a trim ring underneath, lining it up so that you can see one of the four
holes.
Poke the cable tie down through the screen and back up through the hole, and
tighten.
What this accomplishes
is to leave the cable tie 'squares' on top to hold the dome lights in place.
In fact, when you clip the ends of the cable ties, leave a little extra...
Okay, now flip it back
over and drill a few holes 1/2" in from the outside edge
to allow you to cable tie the ceiling to the cage.
I'd suggest putting the ceiling on top of the cage and marking for the holes
first.
I like to place the holes right next to the T connectors, to allow cable tieing
to the T, not the pvc.
One last thing, whether you cut your ceiling in half or not, it needs support...
Cut a 49 1/2" pole and put the 3/4" caps on each end.
The support pole sits
up on top of the cage and the ceiling is cable tied to it.
That gives you plenty of support for all the stuff on top, like dome lights,
a UVb fixture, the timers and powerstrips.
See the support pole peeking out of the top?
By the way, that front
mesh shown could just as easily be white melanine,
especially in the Winter, to retain heat.
I just like the 1" mesh for hand-feeding, clear viewing, and talking or
listening.
Consider them as optional.
.....
Now we've done the
frame, the door, and the
ceiling, but we still have
to do the
back panels, the windows, and the
hanging shelves!
I hope that these plans
are working out well for you.
I've worked very long and hard to figure out these dimensions and this design.
If you've ordered these plans from me. THANK YOU.
If you're using them and
haven't paid for them yet , it's not too late to do the right thing....
It's a very small price to pay and it would be a way to say "Thanks"
back. :)
You can mail a check for
$19.95 to: Keith Van Zile
1125 Clare Avenue, West Palm Beach, FL 33401
or just use Paypal right away. You can even send a note with it!
Thanks!
Keith
or --> Take the cage tour--->>>
Copyright 2001 Lizardcages.com
All rights reserved.
